If you had to design and install a process analyzer sample system today, how would you do it? First, remember that an analyzer system includes the sample tap, sample system, analyzer, sample return, signal transmission and control system. If any of these components fail, your company won't gain the economic benefits the system was supposed to produce. And don't forget, it's generally accepted that sample systems are victims of the Pareto principle, which is that 20% of a system consumes 80% of the resources because they're responsible for 80% of analyzer system problems.
While the engineer's golden rule of "keep it simple, stupid" (KISS) also applies to sample systems, this time it also stands for: Know your process conditions; Involve the right people; Simplify the system; and Select the right equipment.
Get the Right People
In addition to process engineers, a project team will involve several other people as well. A likely group will include the following:
A chemist—A representative from the laboratory who will not only provide the stream composition but also know the present method of analysis used on the stream.
Maintenance/Analyzer Technician—A person, or group of people who must be involved from the beginning, not only to gain get a sense of ownership of the process, but also to understand the technology and equipment before it arrives on-site to get commissioned.
Project Manager—A person who coordinates the entire project, gets the funding, arranges for necessary approvals and other important duties as they come up.
Know the Process Conditions
It's important to understand the process conditions, not only at the sample inlet, but also at the analyzer and all along the sample loop. To do this, three basic calculations must be made: 1) dead spaces; 2) system lag time; and 3) system pressure drop.
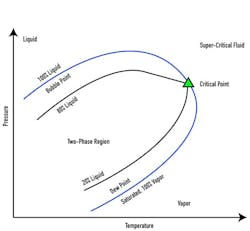
Figure 1: An example of a phase diagram shows how the fraction of liquids, solids, and vapors change as a function of pressure and temperature.
Using this information, a phase diagram (Figure 1) should be generated for all sample streams. This diagram represents how the fraction of liquids, solids and vapors change as a function of pressure and temperature. It is invaluable when trying to determine if there are condensable products in the stream that can later be vaporized as the pressure decreases. This is similar to checking for cavitation in control valve sizing, only in reverse, since rather than looking for vapor in a liquid, one is looking for a momentary liquid phase in a vapor stream. A process or chemical engineer can generate this diagram, along with a range of pressures and temperatures over which the system may be operating, from the stream composition.
Dead Spaces Often Overlooked
One of the biggest and often overlooked items when designing a sample system is dead spaces or volumes. Dead spaces are parts of the sample system where pockets of fluid can become trapped and can't move along with the remainder of the sample. Perfect places for dead volumes are tee fittings, separators or any other sharp-edged flow change. To minimize its effect, use the following rules:
- Minimize tee fittings in the system;
- Purge the sample system three times for each analyzer cycle;
- Use the smallest size fittings able to do the job within other constraints;
- Use the minimum number of fittings possible, which reduces dead time and minimizes potential leak or failure points;
- Operate your continuous sample systems in the turbulent flow regime.
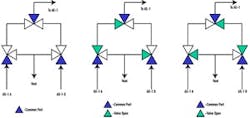
Figure 2: A sample system configuration that is designed to minimize dead volume (left), as well as a configuration designed to minimize dead volume—AX-1A on analysis (middle), and configuration designed to minimize dead volume—AX-1B on analysis.
For example, the first column of Figure 2 shows a configuration designed to minimize dead volume. The three-way valves eliminate elbows, and when a stream isn't flowing to the analyzer for measurement, it's still flowing to a vent or sample return point, ensuring a continuously fresh sample at every point in the system. The second two columns show the configuration when streams AX-1A and AX-1B, respectively, are being analyzed.
Lag Time Depends on Velocity and Volume
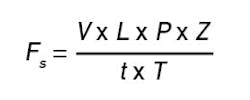
The second item to consider and one of the first things to calculate is the system lag time. System lag time is the sum of the analyzer cycle/measurement time and the sample lag time. Meanwhile, sample lag time is the amount of time it takes for the sample to travel from the sample point to the analyzer sensor. It's simply the volume of the sample system divided by the velocity of the flow and can be calculated using Equation 1.
Where:
t = time
V = sample system volume
L = distance from the sample point to the analyzer sensor
Pa = absolute pressure
Z = compressibility factor
Fs = flow rate under standard conditions
Ta = absolute temperature
Compressibility Is a Factor for Gases at Higher System Pressures
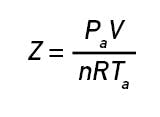
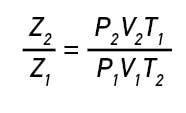
For liquids, compressibility is negligible and the compressibility factor is Z = 1.0. However, in gas systems operating at more than about 35 to 50 psia, compressibility must be considered. For gases, compressibility changes as a function of pressure and temperature according to the rules of the ideal gas law, as shown in Equation 2
Where:
Z = compressibility factor
Pa = absolute pressure
V = volume
n = moles of fluid
R = gas constant
Ta = absolute temperature
The compressibility factory Z can be determined from compressibility charts and the associated reduced temperature Tr and reduced pressure Pr.
The reduced temperature and pressure are calculated as follows:
Tr = Ta/Tc
Pr = Pa/Pc
Where:
Tc = y1Tc1 + y2Tc2 + y3Tc3 … (yx is the mole fraction and Tcx is the critical temperature of component x)
Pc = y1Pc1 + y2Pc2 + y3Pc3 … (yx is the mole fraction and Pcx is the critical pressure of component x)
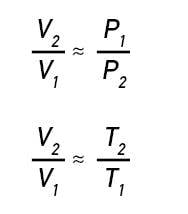
In addition, don't forget that the ideal gas law uses absolute pressures (Pa) and temperatures (Ta), so calculations must be done in psia or kPa (abs) and degree Rankine (R = F + 460) or degrees Kelvin (K = C + 273.15). Also, by combining and rearranging Equation 2 at two conditions and neglecting n, which remains constant, it is also possible to estimate the effect of pressure or temperature on volume.
Thus,
Where:
Subscript 1 refers to the inlet condition
Subscript 2 refers to the outlet condition.
Calculate Sample Flow
If you have a certain size and length of line and want to figure out an appropriate sample flow rate (Fs), at standard conditions, rearrange Equation 1 as shown in Equation 3
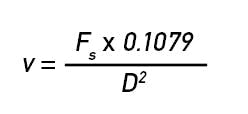
Once you know the volumetric sample flow rate (Fs in liters/min), you can determine the velocity (v in ft/sec) of a stream using Equation 4.
Where:
Fs = volumetric sample flow rate (liters/min)
0.1079 = a conversion factor to get the final result into ft/sec
D = internal pipe diameter (inches).
As a general rule of thumb, the sample system velocity should be in the range of 1 to 2 m/s (3 to 6 ft/sec) to ensure that any components in the sample are carried along with the sample proper and do not drop out of solution.
System Pressure Drop Depends on Velocity
The pressure drop in the system can be calculated using the sample system velocity calculated in Equation 4. This is not as difficult as it sounds, although it is important. Often the hardest part of the exercise is getting an estimate of the stream properties. The equation for pressure drop per 100 feet of tubing is shown in Equation 5.
Where:
ΔP100 = pressure drop per 100 feet of tubing (psi)
fd = Darcy Friction Factor
ρ= density (lb/ft3)
v = velocity (ft/s)
D = pipe diameter (inches)
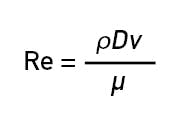
To calculate the Darcy friction factor (fd) we need to calculate the Reynold's number, as shown in Equation 6.
Where:
Re = Reynolds number
ρ = density
v = velocity
μ = viscosity
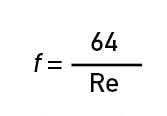
If the Reynolds number is less than 4000, the Darcy friction factor is calculated as shown in Equation 7
However, if the Reynolds number is greater than 4000, then A.K. Jaini's non-iterative equation can be used, as shown in Equation 8.
Where:
f = Darcy friction factor
ε = absolute roughness in inches
D = diameter of the pipe in inches
Re = Reynolds number
Meanwhile, the Moody friction factor, also known as the Fanning friction factor, is one quarter (+) the Darcy friction factor calculated in Equation 7 or Equation 8. Make sure you know which friction factor you're using and, if needed, adjust accordingly.
The last step in the pressure drop calculation is to determine the equivalent length of pipe. The equivalent length (Le) is a parameter used to represent the total length of pipe of a single diameter that would be equivalent to the actual pipe with all its fittings and line size changes. Crane Technical Paper 410-C is the standard that is used to obtain these parameters.
The Crane standard uses the concept of "equivalent length" to assign a factor to each type of fitting or change in pipe diameter to a length of straight pipe that would equate to the same pressure drop as the fitting. Each type of pipe change is assigned a "K" factor as a function of a nominal friction factor (ft). The Crane factor (ft) is a function of nominal pipe size. The equivalent length K factor in the Crane manual is empirically determined from experimental data. After the K factors have been determined for all the fittings, they're summed, and this total equivalent length is then added to the actual pipe run length to calculate a total equivalent length. For example, a pipe system with two 90° elbows and plug valve, the calculation would be as follows:
(ft) = 0.027 (from the Crane Manual)
Plug valve: K = 18 ft (from the Crane Manual)
Elbow: K = 30 ft (from the Crane Manual)
Therefore, Le = (1 x 18 x 0.027) + (2 x 30 x 0.027) = 2.1 feet.
Using this total equivalent length, the system pressure drop can be calculated. Because this exercise is performed so often, two spreadsheets were developed to calculate a simple pressure drop using Equations 6, 7 and 8. Spreadsheet A is for calculating the pressure drop in a vapor line. Spreadsheet B is for calculating the pressure drop in a liquid line. (For links to these spreadsheets, go to the online version of this article at www.controlglobal.com/samplesystems.)
Finally, the last two rues for pressure drop calculations are:
- If the calculated pressure drop is greater than one-third of the total pressure (i.e., inlet pressure divided by three), then calculation should be done in shorter segments, so the outlet pressure of the segment is greater than one third the inlet pressure of that segment.
- Elevation differences between the inlet and outlet of the sample system must be taken into account for liquid streams (the affect on vapor streams will be negligible). Remember, it takes 10.84 psig to move a column of water up a 25-foot pipe rack. Conversely, and more likely, a water stream gains 10.84 psig on its way down from the same pipe rack. This could make a difference in how you set your pressure relief valves.
The equation to be used is:
Where:
DP = pressure drop (feet of liquid or meters of liquid)
r = density (lb/ft3 or kg/m3)
h = height (feet or meters)
g = local acceleration due to gravity (ft/sec or m/sec)
gc = gravity constant (32.17 ft/sec or 9.814 m/sec)
Simplify the Sample System
The easiest way to simplify a sample system is to make sure only the sample you need is collected. Start with the sample tap itself. Taps can be designed in one of the following three ways, and should ideally be installed on vertical pipe runs.
- Continuous, in which a representative continuous slipstream of the process fluid is withdrawn and transported to the analyzer, is the most common sample system. To be representative, the sample probe must extend into the center third of the process pipe.
- Isokinetic and its probe are designed to remove a sample from the stream at the same level of kinetic energy, normally represented as velocity, as the process stream itself. It's used in multiphase streams to insure all components are sampled.
- Discrete. In difficult streams, which are usually extremely hazardous, corrosive or dirty, the most reliable sampling system may be discrete, in which only a small aliquot of the process fluid is transferred as a plug from the sample tap to the analyzer.
To further improve samples from the system, users should seek to minimize dead volume by designing the system so there's always a continuous flow in all lines by selective use of three-way sampling valves. If the stream isn't routed to the analyzer, then route it to either a vent or a recovery system. This also results in a lower lag time. Another way to avoid the problem of dead volume is to insure that the sample system is swept through three times per analysis cycle.
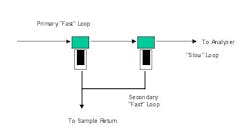
Figure 3: A fast loop is an external loop with minimal sample conditioning that's cycled to a close proximity to the analyzer and from which the actual sample to the analyzer is taken.
This raises and compounds another common problem with sample systems—the analyzer only requires a very low flow rate. Thus, a fast loop is often used (Figure 3). A fast loop is an external loop with minimal sample conditioning that is cycled to a close proximity to the analyzer and from which the actual sample to the analyzer is taken. A common way to separate the secondary (slow) loop from the primary or fast loop is to flow the sample through a bypass filter. The stream that passes through the filter is the slow or analyzed loop. The fast loop remains unfiltered and also removes any excess material that is trapped or coalesced on the filter.
Another important consideration is material compatibility, not only to the process fluid but also to the ambient atmosphere and plant conditions. Most designers are very aware of the process compatibility and normally specify 316SS as their tubing material, going with more exotic materials only when required. However, 316SS is not a good choice where it can be exposed to seawater. The chlorine in seawater will cause the metal to fail in a short period of time. Another choice, Tygon tubing, should not be used if it could be exposed to sunlight. After exposure to the ultraviolet light in sunshine for three to four years, the tubing becomes brittle and fails.
The only remaining problem is how to move all this material around the sample system. This is ideally done through judicious selection of the sample source and return points. If at all possible, two process points of sufficient differential pressure drop should be selected, so no prime mover is required in the sample system. If a prime mover is required, the normal choices are a centrifugal pump, positive displacement pump or an eductor.
If a positive displacement pump is used, then be aware that it tends to require more maintenance than a centrifugal pump because it has more moving parts, and will likely introduce a pulsating flow to the system. A positive displacement pump also has advantages; it is a constant-volume device, and typically has a much higher differential pressure output.
If an eductor is used, then be sure to check the phase diagram to insure that the process liquid doesn't enter the eductor at less than 25 °F below the bubble point. If it does, experience has shown that there is sufficient pressure drop in the eductor throat to cause the fluid to vaporize (cavitation), and so most of the energy introduced to the eductor to induce flow in the secondary stream will be lost.
Select the Right Analyzer
After doing all the calculations to ensure that your analyzer system will operate properly, it's vital that the sample system be linked to the analyzer itself. In most cases, the analyzer selected will dictate to some degree the type and size of sample system installed. However, if the analyzer is not suitable or able to detect the components of interest in the general surrounding process stream, then all is for naught.
In conclusion, the three Rs of analyzer selection are:
- Reliability—The analyzer must be highly reliable so it will maintain a service factor in excess of 95%.
- Repeatability—The output of the equipment must be repeatable for a given input. It need not be accurate (though, of course, this is desirable), but it must always give the same numeric output for a given calibration or process sample.
- Return—Every analyzer system installation must have an economic return or justification. If it is not used for some form of continuous monitoring or control, then the unit will not get the attention it receives to remain in operation at the required service factors to be considered reliable.
Ian Verhappen is an ISA Fellow, a CAP and principal at Industrial Automation Networks (www.industrialautomationnetworks.com).

Leaders relevant to this article:
