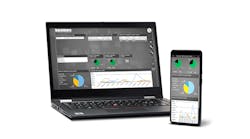
Establishing ideal calibration intervals based on key regulatory, criticality, safety and quality considerations is only the first step in achieving optimal instrument performance. There are other factors to consider when it comes to developing a plan and executing against it. First, since you’re looking to optimize calibration operations and not just keep records, a software application designed specifically to help manage and keep track of your instrumentation is a good first investment.
In a new plant, setting initial calibration frequencies relies on the criticality of the measurement, the maximum permissible error (MPE), the use of self-diagnostics and verification, as well as advice from the instrument manufacturer and qualified calibration team. But in an existing plant, determining calibration intervals based on established work practices and actual historical experience often yields better results.
Indeed, once a calibration plan has been in effect for a few years, the instrument/asset management software takes on an even bigger role. When each calibration is completed, new data is recorded, including the status of the flowmeter before and after calibration. Analysis of these records may very well indicate that the instrument does not require calibration as often as expected, helping to justify longer intervals.
Other advantages of today’s instrument/asset management packages include the support of mobile access to an instrument’s history and supporting documentation. From the field, a technician can pull up real-time diagnostics, calibration history, troubleshooting instructions and other information needed to properly address issues as they arise. In many cases, modern instruments equipped with advanced diagnostics can determine if a problem exists, and automatically notify the maintenance department.
In-house, at a lab, or onsite?
Once the need for a calibration is established, a number of other decisions come into play. First, do you have—or can you afford—the necessary equipment to do it in house? And, do you have the properly trained technicians on staff to perform it properly?
Standard maintenance shops are not equipped for some calibrations. Flowmeters, for example, are far more complicated to calibrate than other measurement instruments, such as for temperature or pressure. Professional calibration labs use pipe-clamp measurement sections to accommodate different diameters. The sections tend to be large, making them cost-prohibitive for many asset owner-operators. Calibrating in-house also necessitates the purchase of one or more costly flow-reference devices—these devices require calibration with traceability, adding further costs and complexity to processes. In such cases, the help of an outside services organization is called for—preferably one accredited to the ISO/IEC 17025 Standard for Testing and Calibration Laboratories.
Flowmeters are often removed from systems for the purpose of calibration and sent to a calibration laboratory.
The commonly held belief is that the necessary calibration accuracy can be guaranteed only under laboratory conditions. However, this is only partially true.
Flowmeters and many other measuring devices can also be calibrated directly on-site by an accredited calibration provider. There are several advantages to this:
- Plant availability improves as the device is calibrated near-line or in-line.
- Sources of error can be detected and eliminated on-site, while the ability to achieve the same result in a calibration lab is limited. Calibration technicians on-site can detect errors during installation and identify blockages or contamination in the pipes directly in the system.
- Cost savings increase due to the speed of completion, reduced downtime and the elimination of an inventory of replacement parts.
- There is no need to disassemble and ship contaminated devices, and costly decontamination measures can be avoided.
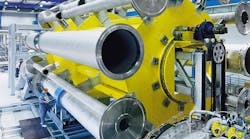
This portable flowmeter calibration rig can be brought onsite to compare flowmeter performance against a standards-traceable reference meter, avoiding the delays and potential damage inherent in transporting the meter to a laboratory.
Endress+Hauser, for example, has both high-end regional calibration centers across the world as well as fleets of portable rigs—supported by highly trained engineers—that can be brought directly to plant sites. Convenient and cost-effective, this approach removes the need to send instruments offsite. Coordinating an onsite visit with a plant outage also allows multiple instruments to be quickly calibrated and returned to service.
These mobile rigs (see photo) compare a flowmeter’s performance against another reference meter with traceability. But for those applications requiring even higher accuracy, or to address especially large meter sizes, one’s choices are limited to dedicated calibration facilities such as Endress+Hauser’s regional calibration centers in Europe, Asia and North America, where a new Gulf Coast campus will open later this year. These dedicated facilities offer traceable, highest-accuracy calibration of even high flow-rate flowmeters.
Even with the budget to purchase the most sophisticated calibration and reference equipment currently available, there is no substitute for a properly trained technician. Not only do they need to be trained on the mechanics of the calibration process, they also need to be equally qualified in completing and maintaining the documentation. Accuracy, repeatability and reproducibility are key and in the world of calibration, if it isn’t properly documented, it didn’t happen.
Truly professional calibration needs highly trained experts. While it is perfectly feasible to calibrate some measuring points yourself, other points present a challenge that it is not to be underestimated, even by experts. In cases involving a large number of flowmeters, calibration requires project planning. The staff conducting these calibrations needs to consider the minimization of plant downtime, the removal and reinstallation of devices, technical knowledge of calibration, as well as the operation and handling of tools and equipment. Additionally, staff must always know the current applicable regulations to ensure that the correct calibration intervals are being observed and can complete the documentation in compliance with the regulations. After all, calibration provides proof and documentation of compliance with the permitted measurement error and plays an important role in audits and certifications.
Furthermore, taking on internal or in-house calibrations can raise questions from an audit standpoint as to what the company’s core competence may be. Is it to produce a product or perform calibrations?
Calibration traceability should follow an unbroken chain of calibrations, so that the highest-level calibration can be traced back to a national calibration standard, or equivalent.
Insist on traceability, accreditation
Traceability means that the reference standards used when executing a calibration have also been calibrated using an even higher-level standard. That traceability should follow an unbroken chain of calibrations, so that the highest-level calibration has been traced back to a national calibration standard, or equivalent.
So, for example, you may calibrate your process measurement instrument with a portable process calibrator. The portable process calibrator you used, should have been calibrated using a more accurate reference calibrator. The reference calibrator should be calibrated with an even higher-level standard or sent out to an accredited or national calibration center for calibration. If the traceability chain is broken at any point, any measurement “below” that point cannot be considered the true representation of the measurement. Comparisons between devices under testing, testing equipment and the country’s highest national standard are the only way of establishing end-to-end traceability of measured values.
Just as traceability ensures the integrity of calibration standards, accreditation ensures that providers of calibration services have the necessary technical expertise, and that the calibration infrastructure (operating procedures, methods, calculations) and quality management systems meets industry best practices. Endress+Hauser’s calibration capabilities, for example, are accredited in the U.S. by the American Association for Laboratory Accreditation (A2LA, www.a2la.org).
Your organization’s competitive edge depends on accurate instrumentation. Optimize calibration in line with your needs to enhance productivity, ensure compliance and maintain quality. Schedule calibration of critical instruments, monitor KPIs for process improvement and call on the expertise of accredited calibration service providers when it makes sense to augment your in-house capabilities.

Leaders relevant to this article:
