I was asked to determine the measurement error, using the square root of sum of squares method (SRSS) if the flow is 50% (ΔP = 25% = 25 in. H2O), the d/p cell is located where the ambient temperature is 120 ºF, and the operating pressure of the flowing fluid is 1000 psig. I was told that we can neglect the error in the receiving instrument (a computer). How do I calculate the zero and span errors caused by the differences in temperatures and pressures between calibration and actual? What will be my total error at 50% flow if I calculate it with the SRSS method?
Harry Crowney
[email protected]
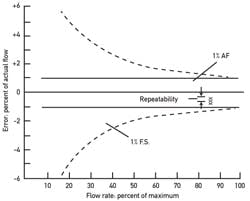
Figure 1: Illustration of the measurement errors of two linear flowmeters. One has a 1% AR (actual reading) error over a range of 10:1; the other a 1% FS (full scale) error over that same range. Therefore, at 25% flow, the absolute error of the AR unit is 1%, while it is 4% for the FS one.
A: The total error of an orifice based measurement is the square root of the sum of the squares of the following errors:Eo: orifice error;
Eref: reference error (repeatability in Figure 1) stated by the vendor, which reflects only the linearity, repeatability and hysteresis errors of the d/p cell;
Etz, Ets, Epz, Eps, which are the errors caused by the differences between calibration and operating pressures and temperatures on the zero and span of the d/p cell. Usually the "zero error" is the greater if the ratio of upper range limit to full scale (URL/FS) is high;
Era: "rangeability error," which rises as the actual flow drops. For linear meters, it rises linearly (Figure 1). For non-linear, orifice type measurement, it rises exponentionally (ΔP ~ F2), and therefore at 33% flow, the ΔP is 11% FS;
Erc: the error of the receiving instrument.
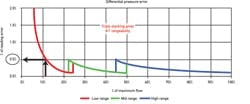
From Figure 1, one can see that if the supplier publishes only Eref, that is much less than the actual total error, which at 33% full scale flow for a typical installation is about 3%. Therefore, if the flow is expected to drop below 33%, we use multiple ranges (Figure 2).
Béla Lipták
[email protected]
Figure 2: Triple stacking of individual transmitters can give an 8:1 rangeability.
A: I would advise two approaches to solve this problem:- Send your instruments (transmitter and orifice plate) to CEESI, SWRI or NIST for calibration at cost paid by your company. Ask if they would release certificate of accuracy at 1000 psig, 120 °F first. Ask for the flow determined coefficients.
- Check the Handbook of Flow Instruments by Dr. Richard Miller. Contact him if necessary. His Flow Consultant software takes thermal expansions of the piping into account, the overall effect of which can influence the accuracy of the instrument by as much as 0.2%.
Gerald Liu, P. Eng.
[email protected]
A: There are many issues. First the flow rate, F, is a calculated value related to the differential pressure, dP, created by the orifice. You will need a calibration equation to convert the measured dP to F. In a mathematically ideal world, F is proportional to the square root of dP. However, many features of the orifice design, installation configuration, flow turbulence number (Reynolds Number), fluid compressibility, transducer discrimination errors, etc. often make the square root idealization inappropriate. Often a power law calibration model, such as F=a*dP^b, where b is in the 0.4 to 0.55 range, derived from experimental data, leads to both more accurate and precise results.
Second, either the ideal square root or appropriated power law model presumes turbulent flow. For your orifice meter testing, you need to be sure that the flow rate remains in the turbulent region.
Third, turbulence-induced fluctuations on the dP signal create noise on the measured F (F appears measured because it is displayed, but F is actually calculated by the calibration equation and the dP sensor signal). The flow turbulence is greater at higher flow rates, but the square root functionality attenuates in the high F range. Accordingly, at low F, as F increases, the measurement noise will increase, but at high F, as F increases, the noise will decrease. Precision is reported as some measure of variability, But this value of precision would change with the flow rate value. You would need to characterize precision at several F values.
Fourth, you could quantify precision by experimental replicate testing or by propagating uncertainty. Use propagation of uncertainty when you are seeking to estimate the errors related to the pressure- and temperature-induced influences on fluid density—measured F. But you will need models that relate pressure and temperature to each source of variation.
Fifth, understand both aspects of measurement error: precision and accuracy. Both can be reported as rms values. Accuracy is measured by closeness to the true value. To report accuracy, you need to compare the "measured" F to a true value of F. To do this, calibrate the orifice meter, then compare the average of the noisy measured F value to a known standard. Even if accuracy is perfect at some flow rate, because the simple calibration equation will not exactly capture nature’s behavior over the entire range, the measured F will not represent the truth over the entire range. Accuracy will change with F. In contrast to accuracy, precision is related to repeatability, replicate variability or noise-induced fluctuations. To report precision, take many samples at one constant flow rate value and calculate the standard deviation of the replicate measurements.
Finally, after you have quantified either accuracy or precision, something will change. Someone will adjust the noise damping feature of the dP cell or the noise filter on the signal or calculated value, which will change the precision and lag associated with the measurement, or the orifice will erode, corrode, etc., or someone will adjust an upstream feature (thermowell insertion, bypass, etc.) which will shift the F to dP relation within the devices, making the calibration equation inaccurate.
With best practices for calibration, installation and maintenance, handbooks report orifice flowmeter error in the 3% to 5% range. They also indicate that 10% error is not to be unexpected. Accordingly, a major concern about flow rate measurement error might justify consideration of an alternate flowmeter type.
R. Russell Rhinehart
[email protected]


