By David W. Spitzer, Spitzer & Boyes LLC
NON-CONTACT, level-measurement sensors, such as laser, non-contact radar and ultrasonic technologies, were developed for applications where contacting sensors were seen as problems, either through false readings or high maintenance. Non-contact sensors are generally located above the material and aren’t directly exposed to the material. These sensors are exposed to the environment of the material in normal operation, and can come in contact with the material when the level of the material is excessively high. Level sensors mounted externally to the vessel, such as nuclear, ultrasonic (bottom-up), and laser (sight glass) technologies, do not come in contact with the material.
All non-contact, level-measurement systems consist of a level sensor located above the material surface that emits a signal and processes the returns (reflections) of that signal. These technologies measure level continuously, but they do so at essentially one point in the vessel. This generally doesn’t pose a problem for liquid applications where the gas/liquid interface is horizontal. Liquid applications with multiple interfaces affect the performance of ultrasonic level devices, while low-dielectric-constant interfaces affect the performance of radar level devices.
In addition, in solids applications, material entering and leaving the vessel affects the solid/gas interface. For example, a rat-hole may form as solid material leaves the vessel. If the level measurement reflects a point in the rat-hole, the measured level will decrease (as expected). However, if the material remaining on the sides of the vessel falls and fills in the rat-hole, the level will abruptly (and unexpectedly) increase. If possible, sensors should be located such that the measured level represents the actual level, while avoiding rat-hole affects. Multiple sensors or scanning sensors may be needed if an appropriate location can’t be found.
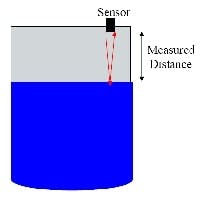
Similarly, laser-level measurement sensors emit a laser beam towards the material, and measure the remnants of the beam reflected from the material. These systems determine the level of the material by measuring the time that the laser beam takes to travel to and return from the material. The distance between the sensor and the material can be calculated as one-half of the measured time-of-flight multiplied by the speed of the laser beam. Mechanical dimensions can then be used to determine the percent level in the vessel.
Laser-level technology isn’t limited by the dielectric constant of the material (as is radar-level technology) nor its propagation velocity in the vapor space (as is ultrasonic-level technology). In addition, the laser beam emitted by the sensor doesn’t diverge much, so it can target smaller areas than radar- and ultrasonic-level technologies. Further, in some applications, laser-level transmitters can be aimed to sense the level in locations that can be difficult to measure using other technologies, such as inside the chute of a bin.
However, degradation of the laser beam’s strength between the sensors and the material can cause laser-level measurement systems to fail. Degradation can occur at the sensor, in transit to/from the material, and at the surface of the material. Dirt, dust or other coatings on a laser transmitter/receiver can cause the received laser signal to be weak. Because accumulations over time are normal for the process, routine maintenance may be required to keep the transmitter/receiver operating properly. In many applications, the sensor may be shielded in a tube and/or continuously purged with gas to keep it working. Similar concerns exist when the laser beam travels through a sight glass that can become dirty and cause attenuation of the beam.
Also, accuracy can be degraded based upon the surface on which the laser beam is reflected. For example, the laser beam will likely measure the top of a layer of foam by reflecting off the top of the foam. If the foam is transparent to the laser energy, the beam may reflect from the foam/liquid interface and measure the liquid level. Translucent foam might cause the level measurement to represent a location within the foam. Further, foam conditions may vary over time and cause erratic level measurements.
Lasers can be used in many non-contact applications where radar and ultrasonics don’t work.
Jim Van Rems, vice president of Riegl Laser Measurement Systems says, “Laser level measurement systems are among the most expensive level-measurement technologies available, so they tend to serve niche markets where no other level measurement technology is viable.” Measuring the level of molten glass and metals at temperatures as high as 2000 C, is one such application, according to Van Rems.
Other typical applications include measuring the level of wet or dry material in tall tanks that pose problems for radar and ultrasonic level technologies. Van Rems warns against installations where the vapor space is opaque to light and/or contains fine particles, reflective surfaces and/or electric charges. For example, the level of flour is difficult to measure using laser level technology because it contains fine particles that reflect light and contain an electric charge that causes light to be obstructed, reflected, and collect on the sensor. Steam is another example of a vapor that reflects light.
In general, pneumatically filled vessels pose more problems than mechanically filled vessels because pneumatically filled vessels tend to disperse particles in the vapor space where they can hinder a laser level measurement system. Van Rems cites a rule of thumb: “If you can see the level despite these influences, the laser level technology will work.”
Ray Charron, product sales specialist with Optech adds, “Particle size and color can have an influence on the ability of the laser energy to penetrate dust. Vapors with coarser particles are usually more easily penetrated than vapors with fine particles. Darker particles are typically less reflective, and are easier to penetrate than lighter particles that tend to reflect the laser energy.”
Also, the intensity of the reflected light and its color can affect the level measurement, so compensation for color is often necessary to accurately measure level. This is especially important for high-temperature applications, such as molten steel, where the color and appearance of the metal can change in a matter of minutes.
Laser energy typically doesn’t penetrate foam to measure the level of the liquid. This may be a disadvantage when liquid level is desired, but in some applications require measuring of the level of the foam. Charron adds that laser measurements generally benefit from diffusion on the material surface, and that surfaces that reflect too much laser energy can saturate the receiver.
Ivo Radanov, laser level product manager at K-Tek points out, “Laser light energy is scattered from the material surface in all directions. This means that laser level measurements are independent of the angle of the material encountered by the laser beam because part of the scattered reflection will return to the sensor.”
In some applications, this scattering will completely defeat the measurement method. Radanov adds, “This is particularly important in solids applications where the material surface usually isn’t perpendicular to the energy beam and provides an advantage over other non-contact technologies that use energy that can be reflected away from the sensor measuring the reflected energy.”
Laser-level transmitters can be sensitive to the reflectivity of the material. This concept is closely related to the material color because different color materials reflect different amounts and different frequencies of light. Radanov mentions that some laser level transmitters are designed to compensate for these differences.
Evert Pol, preventive predictive maintenance and reliability engineer, Dow Chemical Company (Temeuzen, Netherlands) uses several laser-measurement systems for granular materials. “These instruments work well, after start-up problems, and are versatile in that they can measure from the top to the bottom of the silo.” Pol warns other end-users, “Be careful to consider a dirt protection tube that addresses the presence of dust that can hamper laser level measurements.”
Pat White, director of training at Weyerhaeuser (Simsboro, La.), gives laser-level measurement high marks, but not without some of the pain associated with applying new technology. One of White’s applications involved flakes in horizontal bins that are raked away from the fill nozzles, while the bottom belt moves the flakes towards the exit, which is located below the fill nozzles. The net effect is to create a horizontal level where the material tends to form a pile towards the front of the bin. The laser-level transmitter is mounted on the far side of the bin, and measures the horizontal level in the bin.
“When first installed, fines in the vapor space near the transmitter caused the level measurement to indicate false levels at times,” White says. White solved that problem by installing a hood in the bin over the level transmitter to keep the fines from getting in front of the transmitter. Though this method was successful, the hood could become bent if the bin was too full. In the end, the manufacturer developed software that could ignore the fines, and so measure the level accurately and reliably without the hood.
Laser-level measurements have become viable recently enough that there are relatively few suppliers. The prospects for this technology look promising, especially for applications where other level measurement technologies have difficulty. Time will tell whether laser level technology will become viable for more applications, and give end-users another tool in the battle for productivity.
| About the Author |

Leaders relevant to this article:


